How to get UMG widget absolute position in UE4
Today the task in hand was to create an animation feedback of coins when the player collect coins while playing, or when he gets free coins.

The image show the feedback animation concept:

A problem I confronted while programming the coins animation is how to get absolute widgets locations regardless of the hierarchy they belongs to, or what layout panel are under it.
So in this tutorial we will see how to solve the problem and get absolute widgets locations.
As you see in the image bellow, we have two widgets that represent the start position and the end position of the animation, but you can clearly see that are nested inside different layout panels.
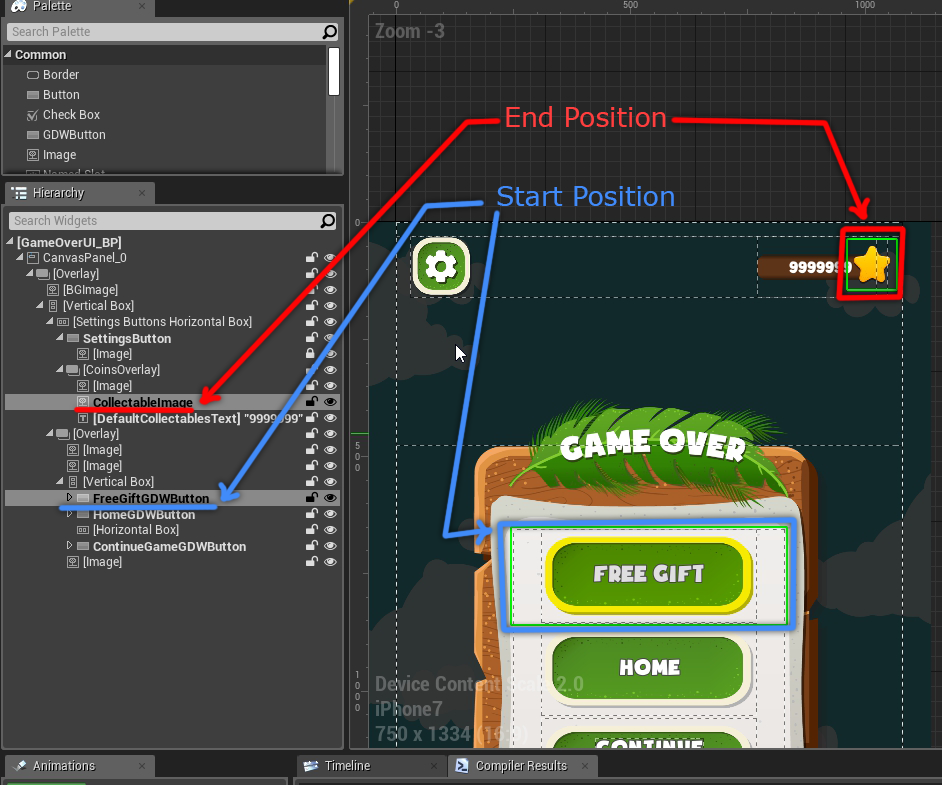
CollecteFeedbackUI_BP is the widget blueprint that will be spawned each time we want to play collect feedback animation.

CollecteFeedbackUI_BP will contain a function that we call from GameOverUI_BP at the widget blueprint creation step when the player click on FreeGift button. The function sets the StartWidget, EndWidget and the ParentWidget of the spawner.

Below is the C++ implementation of InitializeTargetWidgets(…):
void UGDWCollecteFeedbackUI::InitializeTargetWidgets(class UWidget* InStartWidget, class UWidget* InEndWidget, class UWidget* InParentWidget)
 {
     StartWidget = InStartWidget;
     EndWidget = InEndWidget;
     ParentWidget = InParentWidget;
 }
The function SetCollecteFeedbackLocations() bellow sets the position of tho images Image_A (Start) and Image_B (End), these two images are for testing purposes only.
Note: To not confuse you, Image_A and Image_B are c++ references to PosImage_A_BP and PosImage_B_BP which are created in the blueprint.
void UGDWCollecteFeedbackUI::SetCollecteFeedbackLocations()
{
	FVector2D Pos_S =   GetWidgetCenterLocation(StartWidget);
	FVector2D Pos_E =   GetWidgetCenterLocation(EndWidget);

	if (Image_A && Image_A->Slot)
	{
		UCanvasPanelSlot* Slot = Cast<UCanvasPanelSlot>(Image_A->Slot);
		Slot->SetPosition(Pos_S);
	}
	if (Image_B && Image_B->Slot)
	{
		UCanvasPanelSlot* Slot = Cast<UCanvasPanelSlot>(Image_B->Slot);
		Slot->SetPosition(Pos_E);
	}
}
The last function GetWidgetCenterLocation(UWidget * Widget) gets a UWidget object reference as input and calculate the absolute position, the final result is a position of the center of that widget.
FVector2D UGDWCollecteFeedbackUI::GetWidgetCenterLocation(UWidget * Widget)
{
	FGeometry Geometry = ParentWidget->GetCachedGeometry();
	FVector2D Position = Geometry.AbsoluteToLocal(Widget->GetCachedGeometry().GetAbsolutePosition()) + Widget->GetCachedGeometry().GetLocalSize() / 2.0f;
	return Position;
}
I used cached geometry of the widgets to calculate the positions. First I get the absolute position of the widget:
Widget->GetCachedGeometry().GetAbsolutePosition()
Second, I convert the position from absolute to local relative to the root ParentWidget:
Geometry.AbsoluteToLocal(Widget->GetCachedGeometry().GetAbsolutePosition())
Lastly, I add the half of the size of the widget to get the center position:
FVector2D Position = Geometry.AbsoluteToLocal(Widget->GetCachedGeometry().GetAbsolutePosition()) + Widget->GetCachedGeometry().GetLocalSize() / 2.0f

I hope this tutorial helped you. if you have any further questions leave me a comment.


Does this only work if your end position is within the bounds of your widget? For example, i have a small widget (which is just a vertical box with a few texts) that i put inside a different widget (like a main HUD widget), and it is located on the very right side of the HUD widget. I’d like to animate one of the texts from the small widget starting from the middle of the screen to its natural position in the small widget’s vertical box. Also, the Y position of the small widget inside the HUD widget can vary. Is this animation possible?
Yes it’s possible.
You can also achieve this by using the ue4 animation tool, but if you want the animation to be dynamic you can use this.
Thanks you.
Is this general concept possible with BP only? I’m looking to do something similar and don’t know how I would approach with just BP. I’m not a C++ person.
Is this general idea possible with just BP or do you have to use C++?
Yes it’s possible, “GetCachedGeometry” is accessible from BP, you can achieve the same result in Bp.
BP doesn’t give you access to GetAbsolutePosition(), only size.
Hi AI, unfortunately yeah, I just checked it, GetAbsolutePosition() doesn’t exit in Blueprint !
How did you added this moving curve for each star?
How did you set curve for animated stars? Can you share that?
Hi,
I used quadratic Bezier curve, see this (https://www.jasondavies.com/animated-bezier/), I define 3 points: start, middle point and target point and I interpolate between positions as described in the link I shared in this comment.
Hope this help 🙂